GUI
I’ve been experimenting with adding a Graphic User Interface (GUI) to make some of my programs more accessible. After all not everyone is willing to open code and run it in a terminal. I feel this would make a product that can be used by the more general consumer.
This to me is what I traditionally used to think of as programs – something you download and interact with (clicking buttons, dragging and dropping, etc.). It seems that I’m a little late to that game because the world is moving more towards web applications. But I’m not that well versed with my front-end technologies so… I’m taking it back to the beginning of the century (with the exception of the modern tools and languages I have at my disposal). Anyway, let’s get on with it!
non-standard dependencies:
	tkinter         -       apt-get install python3-tk
	pandas          -       sudo apt-get install python-pandas
	pyqt5		-	sudo apt-get install python3-pyqt5
	pyqt5 designer	-	sudo apt-get install pyqt5-dev-tools
Inspiration
I play jazz piano, not very well, but I want to improve. When I started looking for resources and tips, I found exactly that – tons of information, recommendations, and step-by-step instructions from many generous Redditors and blogs. It was immediately overwhelming, but I compiled everything into a nice checklist and ordered them by perceived prerequisite. Then I began.
I mentioned probably in the first post I made here that I spent 6 years using spaced-repetition with pretty good success until the overwhelming speed of upper division physics courses kicked in, but I have no doubt it played a key role in much of the success I had in school until I decided to stop. Now, there are certain endeavors for which spaced-repetition works very well, like remembering facts and deriving equations from first principles all whilst minimizing repetition frequency. But with training neurological pathways where high frequency and activation is needed to strengthen these connections (the so called “muscle memory” that allows pianists to immediately shape their hand to fit the called upon chord structure) can’t be developed with a spaced-repetition protocol. So I really just needed flash cards, but better.
What I wanted to create
Over a year ago, I spent a day writing a simple terminal application that would do what I wanted:
- I wanted to add an item once then forget about it
- I wanted new things to be repeated more frequently so I “catch-up” with the stuff I know well
- I wanted reviews to be purposeful, but with an element of randomness
The way I went about this was actually pretty simple. There aren’t any complex models or heavy statistics used. I envisioned items would be stored in a dataframe with the following format:
| practice task | number of repetitions | date modified | notes |
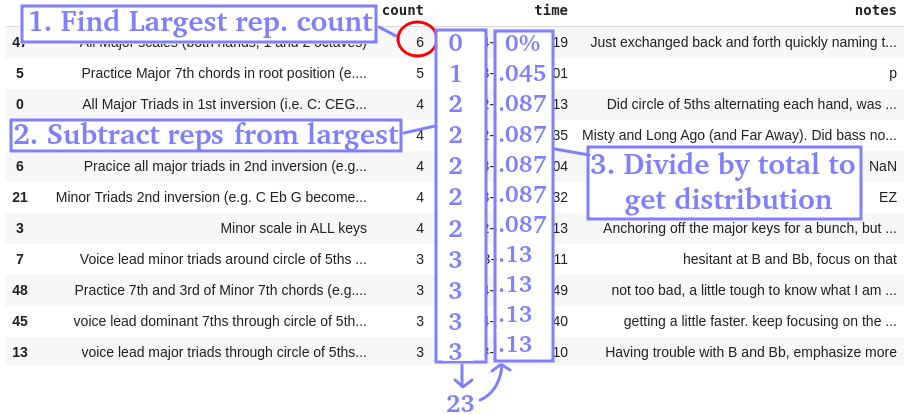
Whenever a new item is added, it goes to the end of this list with a repetition count of 1 and whenever something is practiced, that count is incremented. Now something in this list has the most repetitions, so we find that number:
I subtract each individual repetition count from the largest number and replace it (so the one with the largest number of repetitions is now zero and the most recent stuff with 0 or 1 repetitions is now large, at or near the largest number)
I sum these numbers and divide through to create a normalized probability distribution. This allows me to make a non-uniform, weighted random choice that gives higher probability to less frequently practiced items.
Stage 1 - Terminal application
Total Time: ~ 12 hours
Lines of Code: ~ 120
Result: Minimally functional.
This worked fine for what it was. I just slapped in some python input statements that prompts the user to either practice or add a new item. This adds a “terminal-GUI” of sorts and there you have it, an MVP. I was actually quite fine with this. It was a tool that I only intended to use for myself. Apart from the lack of multi-line functionality, this was lightweight and minimally functional to my liking.
The idea of turning this into a GUI wasn’t really so it would be useable by “the general public” (i.e. anyone afraid of a terminal). It was just to see if I could do it. I’m not sure anyone would really want to use it (would you honestly use this?) Regardless, there are restrictions with this which certainly could use some improvement.
-
No new lines are allowed. Hitting enter on an input would submit the input and adding a
\nwould put a literal newline in the CSV resulting in an error when practice is called (because these newlines are expected to be new entries with their own@separated entries) -
There are characters which throw errors (apart from the
\n’s discussed above)-
@: I used a CSV with@as my separator since it’s uncommon enough. And I could conceive of using these symbols->, | > < # *. But regardless of the char I chose, there had to be a restricted character. I briefly considered a UTF-8 character not available on a keyboard, but the problem is with using a CSV in general, JSON format is ultimately the fix I’d use. -
", ': Because of the way everything is stored as a string in the CSV, I have to avoid words likedon't,it's, etc. It’s a bit of a bother if I forget because the program shuts down with an error and I have to write everything back in. But again, if only I’m using it, I don’t have to worry about these inexplicable errors to the generic user.
-
There had to be a better way and a year(ish) later, I was ready.
Stage 2 - Tkinter GUI
Total Time: 3 days
Lines of Code: ~ 150
Result: It’s a GUI I guess.
At the end of April, this GUI idea came back to my mind. I remembered seeing Tkinter frequently on my terminal while installing new software. After seeing this was a frequently used GUI library, I figured it would be a good choice, so I got to work.
First thing to fix was these forbidden characters. I found that JSON is less restrictive because it acts as a nested hash table (which would provide the additional benefit of speed), everything is stored as a string and quotes are escaped, so no errors with that.
The next improvement would be to the scheduler. You see, I didn’t know pandas at the time of writing the first draft. So I was just saving everything dynamically to a CSV file and performed some glorified string parsing. But with the computational advantage and organizational structure from the pandas library, I created a nice class with add, practice and save methods using a pandas dataframe as my the backbone.
I thought it was what I wanted. It was a working GUI interface. But in reality, I wasn’t really tempted to use it. It was slower for me to use because I had to use my mouse to click the buttons, but at least it can be used be “the general public”. There were no character restrictions and multiple lines were allowed (admittedly after some janky code. You see as I saved it, the string literal \n for new lines were saved instead. And when it came time to bring them up,it wouldn’t be translated so I added a lovely .replace('\\n','\n\) to my saved variables).
So yes it works, but I wasn’t satisfied. In fact I started to write this blog post 10 days ago on the 17th but I wasn’t really that proud of the final product. I thought about what could be better and what I would want (being the only user, I think that’s important). So I started researching other python GUI libraries.
Stage 3 - PyQt GUI
Total Time: 1 week
Lines of Code: ~ 380, but actually 250, and really just 200
Result: It’s a GUI!
So PyQt, a python wrapper around the very powerful Qt. Qt is actually used for lots of applications:
- Calibre (the e-book reader)
- Dropbox (file hosting service)
- OpenShot (video editor I used when assembling my trash panda demo)
- Spyder (python IDE)
- Anki (spaced repetition program very much related to this)
The list goes on and on, but those are the ones I’ve used. Needless to say, it’s a very professional tool to use for my very unimportant piece of software.
One very wonderful thing about PyQt5 is that it comes with it’s own GUI interface (wonder if it’s written in PyQt? Meta!) That allows you to drop in buttons, labels, text boxes, etc. This gets saved as an xml file which will compile to the equivalent source code, so there’s much less time being wasted on fixing box sizes and locations. I was initially hesitant to use it because I wanted to learn to code it all from scratch. But honestly it would have taken another week because this is a dense library with ~450 classes and over 6,000 functions and methods. Plus that’s just layout. Mapping buttons to functions and implementing the scheduler class was where the core of it was. So of the ~380 lines of code, I had to add 250 because the designer set up the structure. But the scheduler class was written for the Tkinter GUI, so that was just copied over.
This is something I’m proud to showcase, proud to post about and will continue to use (100% user satisfaction). It’s just as fast as using the terminal because keyboard shortcuts are available. And the star feature of it all: It’s got image support via drag and drop! My use case (yours, if ever you would use this dear reader, may be different) is for jazz piano. It was inspired by the numerous times while using the terminal application where I thought having an image to reference would be useful– Chord charts, progressions, licks, sections of sheet music, these are now all possible.
Comments
This is a test of the newly implemented comment system